The Basics of Stainless Steel Temper Conditions
The word “Temper” gets thrown around a lot in the metals industry. The most common connotation refers to a hardened state of material, or the act of hardening through tempering. If we consider the annealed state, the state after which an alloy has been heated to above its recrystallization temperature and soaked until the desired grain size is achieved, to be the baseline for that alloy’s strength, tempering can be defined as acting upon the alloy in order to increase its strength beyond the annealed state. In the case of Ulbrich Specialty Strip Mill, the action we impart on our alloys in order to temper or harden them is work hardening through cold rolling.
Cold rolling, a wrought metal process, induces cold work, or plastic deformation without preheating, by reducing the thickness of a strip metal coil. This plastic, or permanent deformation, induced by the rolling process, causes not only a macroscopic change in product dimensions, but also a microstructural change resulting in work hardening. In the eyes of someone observing the rolling process, the metal strip advances through two work rolls, one above and one below, and via a combination of vertical force and longitudinal tension, the strip is squished down and made thinner, longer and stronger. The rest of this essay will cover the microscopic phenomena that facilitate these changes.
In order to understand work hardening, some metallurgical basics must first be understood. The metal alloys manufactured by Ulbrich, consist of an array of microscopic crystals called grains, randomly oriented throughout the bulk of strip. The building blocks of an individual grain are the atoms of the elements which make up an alloy, such as carbon, iron, nickel, chromium…etc. The grains of an alloy have a thermodynamically preferred repeating arrangement of atoms, called a unit cell, based on the alloy’s chemical composition. A homogenous section of metal consisting of one repeating unit cell forming one or more grains can be called a phase. Certain alloy families are even named after phases. The 300 series stainless steel alloys are referred to as austenitic because they consist predominately of the austenite phase in the annealed condition. Certain 400 series alloys like 430 are referred to as ferritic due to their ferrite phase, while others like 410 and 420 are referred to as martensitic due to their martensite phase. The mechanical properties of an alloy are a function of the phases existing within the alloy as well as the size and arrangement of the grains of each phase.
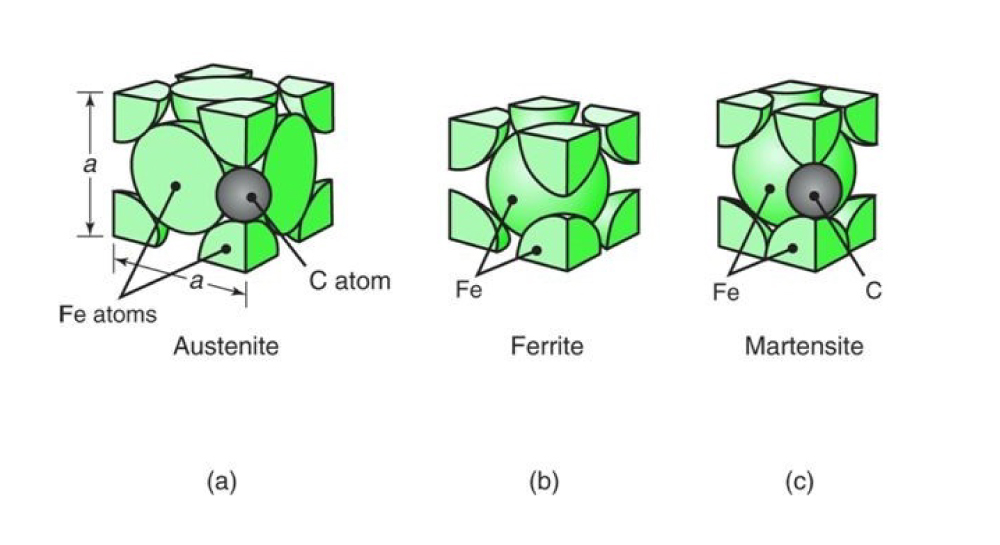
(a) Austenite unit cell displaying the arrangement of iron (Fe) and carbon (C) atoms; (b) Ferrite unit cell displaying the arrangement of iron (Fe) atoms; (c) Martensite unit cell displaying the arrangement of iron (Fe) and carbon (C) atoms
So where does work hardening factor into all this? In all but very specialized cases, wrought metal products do not consist of a single grain with a perfect crystal structure that repeats throughout. Like all things in life, metals are imperfect. Everyone knows the phases of water. Gaseous water vapor, liquid water and solid ice. Like water, when heated to a high enough temperature, metals will melt and even evaporate at extremely high temperatures. Known ratios of the constituent elements of an alloy are melted in a huge crucible, mixed into a homogenous solution and then cast into ingots of that alloy. When a liquid metal solidifies, unless extreme care is taken to facilitate the precipitation and growth of a single grain, solid grains of the thermodynamically preferred phase will precipitate anywhere the pressure, temperature and chemical composition allow them to. Many grains will precipitate wherever they can and grow until they encounter another grain, at which point a grain boundary is formed.
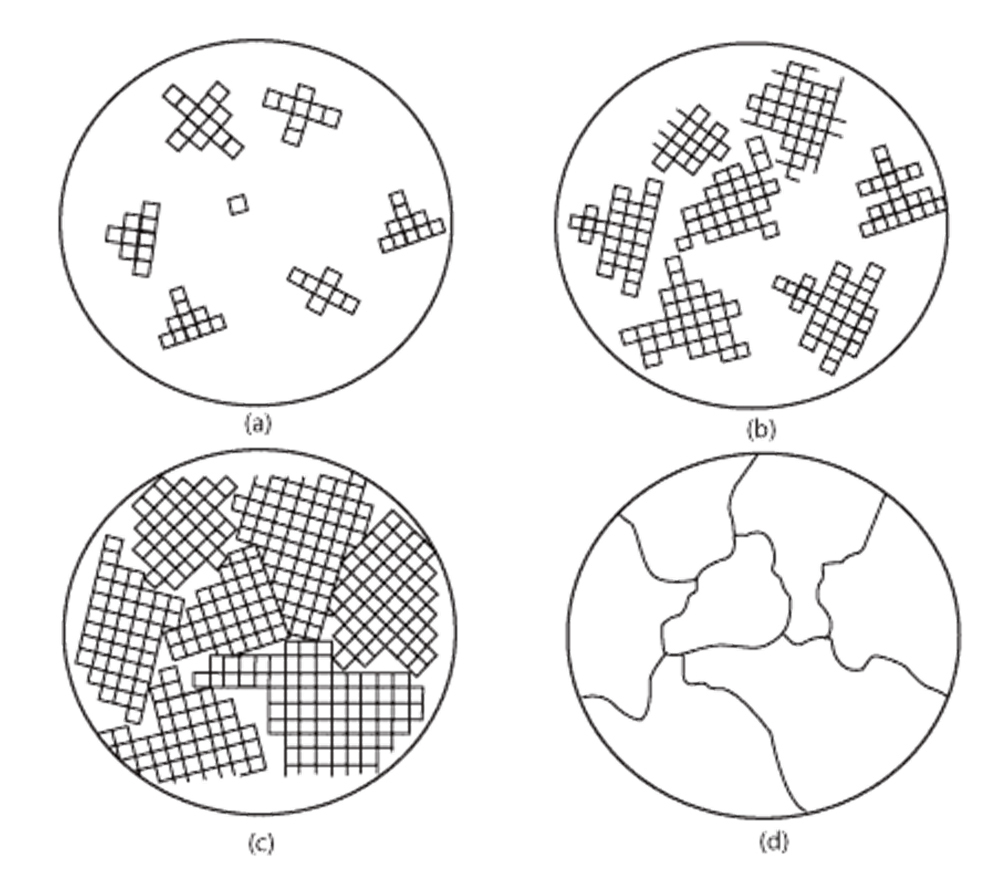
(a) Initial grain precipitation; (b) Grain growth; (c) Further growth and boundary formation; (d) completed grain structure
Eventually the entire bulk will consist of these randomly oriented grains. This same process occurs when an alloy is annealed, but instead of turning into liquid, the grains dissolve into a solid solution and then recrystallize and grow as a function of time at temperature and cooling rate, essentially resetting the microstructure. Anytime a grain is formed, there is a chance for one or more line defects, or missing pieces of a crystal structure know as a dislocation to exist. These imperfections, the dislocations in a crystal structure and their subsequent movement throughout a grain and across grain boundaries are the basis of metal ductility. When all the atoms are where they are supposed to be in a crystal structure, there is no room for movement beyond the atomic bonds stretching, and vibrations throughout the structure. When you remove an atom, you create an opportunity for another atom to slide into that spot, effectively moving the dislocation. When a force acts on the bulk alloy, the aggregate movement of the dislocations in a microstructure allows for plastic deformation without fracture.
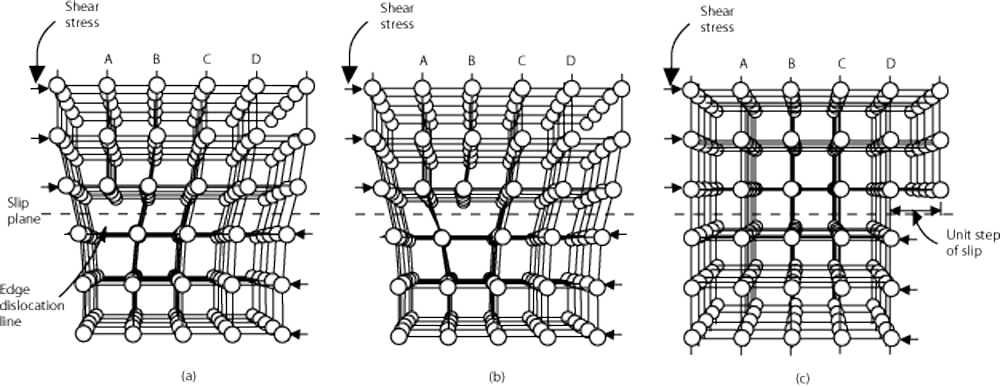
(a) Lattice with dislocation; (b) Dislocation movement within lattice; (c) Plastically deformed lattice
This is where work hardening comes in. When a force is acted upon the bulk alloy, work is done to it, meaning energy is added to the system. If enough energy is added to result in plastic deformation, the crystal lattices are strained and new dislocations form. This seems like it should increase ductility, because there are more free spaces and therefore more potential for dislocation movement. However, when a dislocation runs into another dislocation, they can lock, or pin each other in place. As the number and concentrations of dislocations increase, more and more dislocations get pinned together, reducing ductility. Eventually, there will be so many dislocations, that no more dislocations will be able to form as a result of cold work. The existing pinned dislocations cannot move, so the atomic bonds in the lattice stretch and stretch until they break, causing a fracture. This is why alloys work harden and why there is a limit the amount of plastic deformation a bulk alloy can take before it breaks. Cold working an alloy can even change the phase of the microstructure. As energy is added to an austenitic alloy and the microstructure is strained more and more, some of the austenite will actually transform into martensite. At room temperature, martensite has higher strength and less ductility than austenite, which results in a stronger, but more brittle condition. It is also why 300 series alloys are non-magnetic in the annealed state and increase magnetism with work hardening; Austenite is non-magnetic while martensite is magnetic.
The rate at which an alloy strengthens in response to cold work is called the work hardening rate. It is not necessary to observe all of the microstructural changes going on during cold work to predict material performance. When it comes to 300 series stainless steels, or austenitic stainless steel, adjusting the chemical composition can change the work hardening rate. Different elements help stabilize certain phases and tuning the amount of these elements can help control the work hardening rate. For example, increasing the Nickel content in austenitic stainless steel will slow down the work hardening rate. This is why 301 stainless steel (6-8% Nickel) work hardens faster than 304 stainless steel (8-10% Nickel). This increase work hardening rate means that you can achieve higher strengths without losing as much ductility. If 301 material undergoes the same amount of strain as 304 material the 301 will end up harder because of its higher work hardening rate. This is part of the reason why 301 is preferred for forming operations involving stretching and bending, while 304 can be used for drawing operations where material is required to flow without rapidly hardening and tearing.
Temper classifications like full hard and super full hard are not discreet states of strength that a given alloy can achieve. In reality, an alloy’s strength will increase along a curve as a function of the strain applied to it:
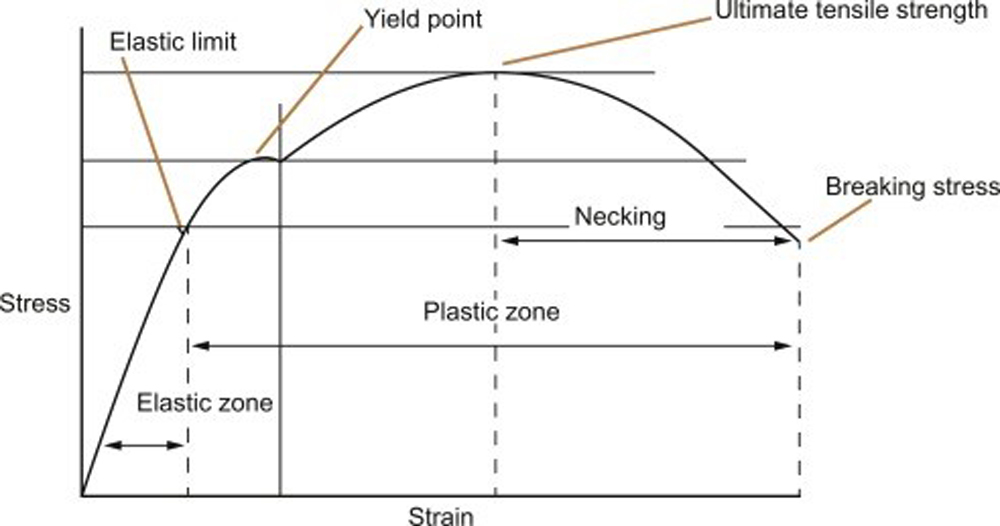
Theoretical stress strain curve and features
The tensile strength and yield strength of a material are often expressed as a unit of stress (psi, Mpa), which is calculated by dividing the force applied by the cross-sectional area of the section that force is applied to. The ductility of a material can be quantified as percent elongation, which is an expression of strain. Strain is calculated by dividing the change in length caused by an applied force, by the total length of the stressed section. Percent elongation is an expression of the strain at fracture as a percentage: [(final length – initial length) / initial length] x 100. It represents how much a material can be stretched beyond its original dimension without breaking. Metals do not always plastically deform in response to stress. The steep region of the curve at lower strains is called the elastic portion because it represents non-permanent, or elastic strain. A metal section can be stretched a certain amount without plastically deforming, meaning that once the applied force is removed, that section will return to its original dimensions. Understanding the size of the elastic portion of a curve is important in metal forming because a material’s elasticity will translate into spring back. The more strain a material can realize without plastically deforming, the more spring back there will be.
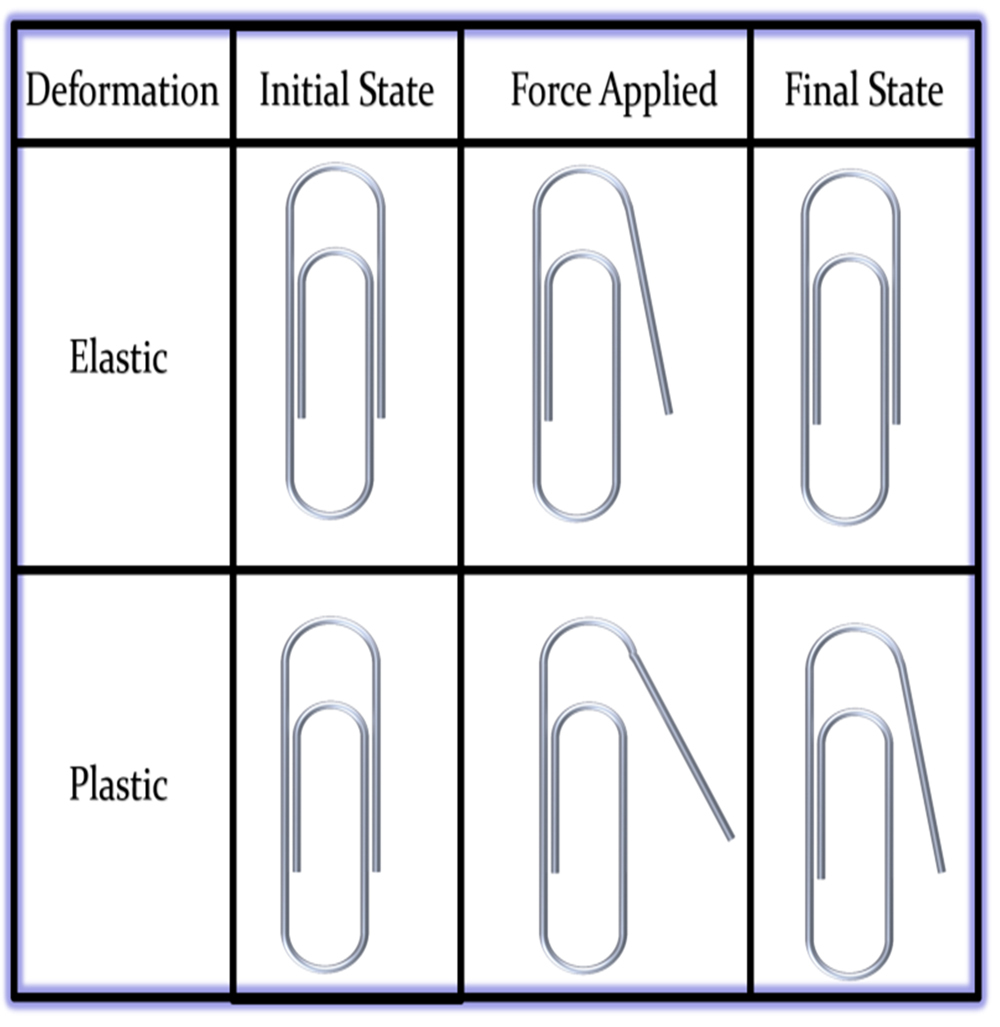
Elastic vs Plastic Deformation. In the plastic row, the difference in position between the paper clip arm in the “force applied” image and the “final state” image is often called “spring back”.
Temper classifications are nomenclature accepted across the metals industry to make it easier for parts manufacturers to order material with consistent and predictable mechanical properties. The American Society for Testing and Materials, or ASTM, writes and publishes specifications to define tempers. Ulbrich’s customers often consult ASTM A666: Standard Specification for Annealed or Cold-Worked Austenitic Stainless Steel Sheet, Strip, Plate, and Flat Bar, when selecting a material and temper for a formed part. ASTM A666 provides mechanical property requirements for 200 and 300 series alloys for the following conditions from softest and hardest respectively: Annealed, 1/16 hard, 1/8 hard, ¼ hard, ½ hard, ¾ hard, full hard and super full hard. The specification details requirements for almost all the alloys for 1/16 through ½ hard, but for ¾ hard and full hard, only 201, 205, 301, 302 have specified properties. At super full hard, the only alloys included in the table are 301 and an alloy that is exclusively specified for super full hard: 301SI. UNS S30116, or 301SI, can achieve any of the lower tempers. The reason it is not specified for them, is that 301 has a more predictable work hardening rate in that range. 301SI was designed specifically for high temper applications like springs, fasteners, washers, zippers, clips and clamps. Normal 301 has a maximum Silicon content of 1%, while 301SI has a minimum Silicon content of 1% and a max of 1.35%. Additions of Carbon, Manganese and Silicon all increase the strength of austenitic stainless steel. Increasing Carbon and Manganese beyond the limits specified for 301 can have detrimental side effects, yet it was found that a nominal addition of Silicon would boost the work hardening rate just enough to justify giving the new composition its own Unified Number System (UNS) designation. As a material is work hardened, the tensile to yield strength ratio decreases as a byproduct of decreasing ductility. A lower tensile to yield strength ratio means the elastic portion of the stress strain curve is larger and the material can take more stress before plastically deforming. 301SI is a good alloy for springs because it can achieve higher strengths without fracturing, resulting in elasticity at a wider range of stresses.
It should be noted that, even though ASTM A666 doesn’t specify full hard 304, that alloy can still be tempered above its ½ hard property range. The reason ¾ and full hard 304 aren’t ASTM standard tempers is because the ductility of 304 drops off rapidly beyond the ½ hard strength level. When a customer requests a quote from Ulbrich for full hard or spring tempered 304, we often explain that ASTM does not define such a temper, but then also work with them to understand their need. We can temper 304 to 185 ksi min tensile strength, the minimum tensile strength of full hard 301, but it will not have the 8% minimum elongation expected of full hard 301. It may only have 3% or less elongation, but oftentimes this will be enough ductility to facilitate the customer’s forming process and they have other reasons why they prefer 304 over 301.
So, what is the point of having all of these tempers? Why are people tinkering with chemistries and dividing tempers into 1/16ths? There is so much nuance and skill that goes into successfully forming a part that the tool and die experts don’t always want to have to become a materials science expert as well. There is so much liability in the aerospace, medical or nuclear power industries that their engineers want to have proven standards developed and vetted by industry veterans to rely upon. Relying on an industry defined temper allows parts manufacturers to eliminate mechanical properties as a variable, because they know what forming behavior to expect from a condition if they’ve used it before. Each temper does have a range of allowable tensile, yield and elongation, so there is some variation within any given temper - especially in the case of the large gap between full hard and super full hard - but defining tempers like 3/32 or 5/64 would be a little ridiculous. If an application requires a greater level of precision with regard to raw material mechanical property ranges, a custom specification can be developed, with the assistance of the Ulbrich Technical Services team if desired. If a customer attempts to form a part using ½ hard material, and experiences brittle fractures due to a lack of ductility they can try ¼ hard material. If the ¼ hard material doesn’t reach the desired hardness after forming, then they might need the equivalent of a 3/8 hard temper, which will need to be specified beyond an ASTM reference.
How does Ulbrich Specialty Strip Mill achieve a given temper? In the case of an annealed product, the strip undergoes rolling and annealing cycles until the ordered thickness is achieved. The strip then undergoes a final anneal cycle to reset the microstructure and establish the uniform and equiaxed grain structure expected of an annealed product. In the case of tempered items, there is no final anneal operation. Instead, a specific amount of strain is induced via cold rolling in order to work harden the product to the desired mechanical properties. This strain is expressed as a ratio of the starting thickness and final thickness referred to as percent reduction. If a product is rolled from .020” thick to .010”, it has undergone a 50% reduction in thickness. Ulbrich performs a statistical analysis using its long history of mechanical property data accrued through quality control testing to predict the correct percent reduction for a given temper condition. This number can vary based on factors like alloy, individual lot chemistry and even final thickness. The percent reduction in thickness needed to achieve full hard will always be much higher than the reduction needed for ¼ hard, but two 301 lots being rolled to the same full hard condition may require different percent reductions. Ulbrich engineering aims to finely control processes in order to reduce variation between lots as much as possible. If a 301 product with properties near the low end of the ¼ hard range works for a customer, a process will be developed to achieve properties near the low end. Every step of a manufacturing process has variation, and by reducing the variation in raw material mechanical properties a stamping house may not have to tweak their setup quite as much when starting a new lot of material.


